Showing posts with label Boxset. Show all posts
Showing posts with label Boxset. Show all posts
Thursday, 21 May 2015
Wednesday, 20 May 2015
Publication Development
Design Publication.
After deciding the concept for my publication, and deciding what I am going to do with it, I started to work on the images that I am wanting to include in the publication. For each section I want to include spreads about the briefs that I have produced, why imagery is important to this subject and the studios that I have been to during third year that relate to this.
The first section of my publication is about image making and why it is important therefore I decided that it would be good for me to include my 100 days of...monster challenge as the main purpose for this brief is making an image a day. After researching into different things for the publication, I found Ricky Gervais's flanimals book. This lead me into thinking about dissecting my work into stages, like he dissected his flanimals and explained them. Doing this would show my methodology and the way that I work. Showing how I go from nothing to the image that I create, then also showing how I apply it to different areas of design.
Development.


 The process of image making for me after the research and the thinking of ideas for a brief or project, would to be doing the initial drawing either on paper or digitally drawing it, although I would usually digitally draw things. Then I start to decide on the colours that I think are appropriate. Next is the adding of the contours, making the image less two dimensional where appropriate. Then finally I add the details that finish the images off. This will bring them to life a bit more. This is such an important process in the way I design. I think that dissecting the the images and annotating them, showing the stages that I go through will work really well for the publication, showing different examples of the way that I can then apply this to different areas of design.


 After dissecting the first monster I started to get a grid system going about how I would produce the images for my publication. I wanted to create my book in the way that I would create any other piece of design, therefore each illustration would form a piece of information graphics about my images.
 I think that showing how some of the briefs that I have been doing have developed is important, as it shows past the image making process, and shows how the image making progresses into how it is applied and adapted. I think that this is a really important part of my methodology, therefore it needs to be included in my publication.

 For each of the areas of design I will include two double page spreads about a brief that I have done during the third year, that shows my methodology. Starting with the development process, then into the image making, followed by final pictures of the brief itself and the outcome that I have made.

 This structure and grid system has been applied throughout the whole publication, so that it all fits in together as the publication is forming. I think that having the publication be in a certain order and have a grid system to it is important as it enforces the way that I work, as I like stucture and works in an order.

 I decided that I would create the layout for the image making process pages in the illustrator and using a grid system in there so that it was easier for my to figure out where each of the images are going and how they will be annotated. Also it would help when I was actually dissecting the images.
 Starting the publication with my statement/manifesto is a good idea, as this will introduce the reader to who I am as a designer and what I am interested in. Then moving onto the net page of my methodology in a diagram, also reenforcing this by repeating it on the back page. This will give the reader a good idea into what the entire publication is about.


 Showing that the grid system is the same throughout works well for me, as it shows that my methodology is consistent throughout my design process, through keeping my grid system consistent throughout also.
This is the final digital copy of my publication, I am really happy with it and think that it is a really good way of showing me as a designers, as well as the process that I go through. As well as this being a publication showing my methodology, it can also be a good thing to show to studios, as it shows a lot about me, my designs, and the process that I go through to get there. This would give the studios a thorough understanding of me as a designer.
After deciding the concept for my publication, and deciding what I am going to do with it, I started to work on the images that I am wanting to include in the publication. For each section I want to include spreads about the briefs that I have produced, why imagery is important to this subject and the studios that I have been to during third year that relate to this.
The first section of my publication is about image making and why it is important therefore I decided that it would be good for me to include my 100 days of...monster challenge as the main purpose for this brief is making an image a day. After researching into different things for the publication, I found Ricky Gervais's flanimals book. This lead me into thinking about dissecting my work into stages, like he dissected his flanimals and explained them. Doing this would show my methodology and the way that I work. Showing how I go from nothing to the image that I create, then also showing how I apply it to different areas of design.
Development.


This is the final digital copy of my publication, I am really happy with it and think that it is a really good way of showing me as a designers, as well as the process that I go through. As well as this being a publication showing my methodology, it can also be a good thing to show to studios, as it shows a lot about me, my designs, and the process that I go through to get there. This would give the studios a thorough understanding of me as a designer.
Friday, 8 May 2015
Quentin Tarantino Box Set Photography
Quentin Tarantino Box Set.
Photography.
For the Tarantino box set I wanted to do it justice, as the box set itself looks really well made and like it is a real thing, therefore I want this to be seen in the photos. The colour scheme used in this box set is a lot of black and red to show the violence in the films. The black on black is a theme that I have gone through throughout the making of the box set therefore I think that it is appropriate for me to have a black background for the photography.


The photography for this brief took a lot longer than I thought it would as there is so much information that I wanted to show. The main parts of the making and designing of the box set were the covers and the imagery inside, including the information graphics. Although showing all of this is one picture would be really hard. Also what looked most effective in the photos were the box set itself and the pattern that I made for in. The red and black work well together this is why I chose for it to be on a black background.
Sunday, 3 May 2015
Boxset Evaluation
Evaluation.
I decided
to create a Quentin Tarantino Box Set because films are something that inspires
me in my design, and Quentin Tarantino is an amazing director, therefore this
is something that I have always wanted to produce. As well as this he is
releasing a new film called The Hateful Eight at the end of 2015, therefore it
would be a great time to release a collectors box set whilst the lead up to the
film is on. The box set itself has been crafted well and there isn’t anything
that I would change when it comes to the crafting or the printing of any aspect
of the box set. Due to pages not measuring up correctly I had to change the
publication at last minute to a staples rather than perfect binding. Although
this has worked well because it now looks more like it would be real, it also
fits in with the box set more.
Throughout
this brief my crafting skills have improved massively, and I think that
packaging is something that I really enjoy doing. I have also realised that I
don’t just enjoy doing one thing, I enjoy many areas of graphics design. During
this brief my skill on Illustrator and Photoshop have also improved. Photoshop
is a piece software that I use only when necessary, this is because I am not as
confident on Photoshop, although I feel like my skills have improved a lot
whilst making this brief. If I had to do this brief again I would have done it
before Christmas when I originally started it, as I started the brief in October
but then started to continue it again in February. I think that dipping in and
out of a brief makes it a lot longer than it should be, therefore I would plan
my time better if I were to do this again.
This is
one of the most realistic briefs that I have ever produced and it is the brief
I am most proud of. Although it took a lot longer to produce than I thought
that it would, it was worth the time for the quality that it came out as. This
is something that I have learnt during this brief, creating a good concept and
a plan for a brief and taking time over it is really important, rather than
rushing through to get straight to the design. The Skills that I have gained
during this brief is on Illustrator, I have found many more short cuts to use
also I work so much faster now to produce the same quality design. For example
the first cover that I produced took a lot longer than the last. The box set is
appealing to the right target audience and the colour scheme is appropriate to
Quentin Tarantino along with the logo I created for the box set, this is
strength in my design. Time management is a huge issue of mine, although this
is something that I have improved throughout this brief, even though I stopped
doing the brief for a few months, when I started again, I did everything to the
plan that I set myself.
Sunday, 26 April 2015
Tarantino Publication
The Publication.
The Content.
Inside the publication I am wanting to include information about the films that are in the box set, information about Tarantino and the films that he has directed and written and the trade mark things that he does in them, also trivia about him as a person and film maker. I also want to include some information graphics about the films, and something that will link all of the films together.
Information Graphics.

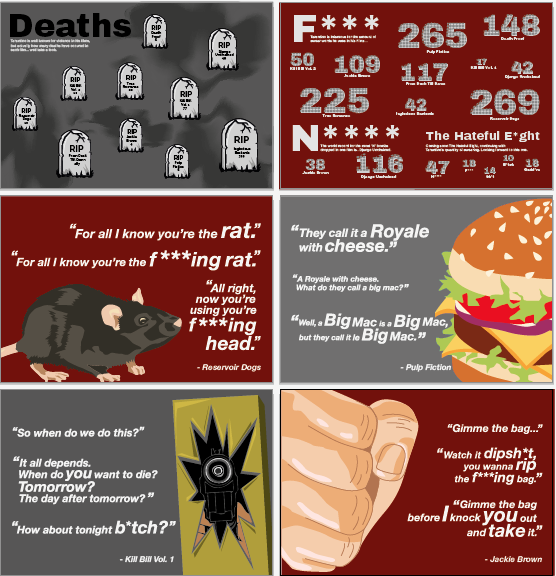
 The * sign is used to blank out swear words, therefore creating an info graphic about how many times different swear words are used in Tarantino films, this glyph would be appropriate to use. I thought about using as many glyphs as there are swear F bombs in the information graphics, but as there is such a range of the amounts used, I think that it would be better to use a type based info graphic.
 I started to think about how it would work, and how I would show how many there were and which films had the most. Therefore thought that I would use the numbers, whilst also making the larger numbers larger to show clearly how much more it was than others.


 I also started to think about using the glyphs as a mask of the numbers,
this will add detail to the info graphic and make it more aesthetically
pleasing. As well as this I started to think about the colour scheme that I have decided on, although I think that it looks too garish and event thought the colours are appropriate for Tarantino and the films that he has produced, they don't work very well within the information graphic. I will move onto the next info graphic and decide what I am going to do for that, then I can think about the colours that I am going to use and what will be appropriate for them all.
I also started to think about using the glyphs as a mask of the numbers,
this will add detail to the info graphic and make it more aesthetically
pleasing. As well as this I started to think about the colour scheme that I have decided on, although I think that it looks too garish and event thought the colours are appropriate for Tarantino and the films that he has produced, they don't work very well within the information graphic. I will move onto the next info graphic and decide what I am going to do for that, then I can think about the colours that I am going to use and what will be appropriate for them all.
 I also decided that I would work on an info graphic for the amount of deaths in Tarantino films, this is becasue I think that it will relevant to the films as they are quite violent films. Also I found a lot of information about the deaths in the film and how everyone was killed, therefore this wouldbe very effective in the publication.


 Similar to the swearing info graphic, I have made the headstone larger for the amount of deaths in the film. This will keep the info graphics consistent throughout the publication. But again I don't like the colours used, I think that I need to look further into the colour scheme throughout the publication to see what is most effective.

 Moving back onto the first info graphic, I have found that red works quite well with white and grey. It stands out amongst the background and the information just out at your which is what I was going for with the information. Also the red does go with the colour scheme that I was using originally. Although I still think that the colour scheme needs a lot of work, this works well for these statistics.
Images and film quotes.


 For some of the films I think that having some memorable quotes and scenes would work well in the publication to split up some of the pages about the films, as currently they are quite blocky. The royale with cheese quite is one of the most memorable scenes in pulp fiction. Using a cheese burger illustration to support the quote will engage the audience further.
 I have done the same thing for a few more films, one of the being Jakie Brown, illustrating it with a fist to show people punching.


 Similar to the others, the Kill Bill Vol. 1 and Reservoir Dogs have their quote supported by an illustration to create something that is effective. Whilst doing this I found that using greys instead of browns in the graveyard info graphic works so much better. It creates a darker and gloomier effect and also makes the colour scheme for this go with the rest of the publication.
 Having all of the illustrations and info graphics together shows how much they work as a set. These will go really well in the publication. Dividing the pages of the films using double page spreads will give the publication more substance whilst creating something interesting to look at throughout.
Moving on from this I will be printing the publication and preferably perfect binding it, this is so that it would fit in well with the boxset. The publication is the size of one of the DVD cases, therefore I can bare this in mind whilst making my box set. I hope that the colour prints well within the publication and works well with the colours used in the box set its self.
The Content.
Inside the publication I am wanting to include information about the films that are in the box set, information about Tarantino and the films that he has directed and written and the trade mark things that he does in them, also trivia about him as a person and film maker. I also want to include some information graphics about the films, and something that will link all of the films together.
Information Graphics.
Images and film quotes.
Moving on from this I will be printing the publication and preferably perfect binding it, this is so that it would fit in well with the boxset. The publication is the size of one of the DVD cases, therefore I can bare this in mind whilst making my box set. I hope that the colour prints well within the publication and works well with the colours used in the box set its self.
Subscribe to:
Posts (Atom)